The fluid technique is a popular method for creating intricate and detailed designs in soap art. It involves layering thin streams of soap colorant or soap base on top of each other to create a flowing, marbled effect. The technique is easy to learn and can be used to create a wide range of designs, from simple patterns to more complex, abstract shapes.
To get started with the fluid technique, you’ll need some soap colorant or soap base, a small container for mixing, a silicone mold, and a heat-resistant container for melting the soap. Here are some steps to help you get started:
- Melt your soap: Begin by melting your soap colorant or soap base in a heat-resistant container. You can use a microwave or a double boiler to melt the soap, but be sure to follow the manufacturer’s instructions to avoid overheating or burning. Once the soap is melted, add any fragrances or essential oils that you want to use.
- Mix your colors: If you’re using soap colorant, you’ll need to mix together the colors that you want to use. You can use a small container or a pipette to mix the colors together until you get the desired shade. If you’re using soap base, you can skip this step.
- Prepare your mold: Once your soap is melted and your colors are mixed, you’ll need to prepare your silicone mold. You can use a spray bottle filled with rubbing alcohol to lightly mist the inside of the mold, which will help to prevent the soap from sticking.
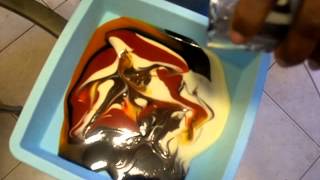
- Begin layering: Once your mold is prepared, you can begin layering your soap. Using a pipette or a dropper, carefully add thin streams of soap colorant or soap base to the mold. You can use a variety of colors and layering techniques to create different effects, such as marbled patterns or swirling designs.
- Allow the soap to set: Once you have finished layering your soap, allow it to set for a few hours or overnight. Once the soap is fully set, you can carefully remove it from the mold and use it as desired.
With a little practice, you’ll be able to create beautiful, intricate designs.
Inspired by fluid art paintings – All natural colours used To see the painting that inspired this go to: http://honestly-wtf.tumblr.com/post/8017415994/youre…
How to paint your own space scene using Liquid Acrylic Film Technique. Be sure to check out my New You Tube channel ! My New Channel “Pencils and Paint” http…
Video Rating: 4 / 5
[wpramazon asin=”0823099202″]
40 replies on “Soap Art – The Fluid Technique”
This is some serious ASMR action for me lol. I wish this video was 50 hours
long, haha. Beautiful colors btw.
That soap looks really pretty, you should have filled the up to the top.
But I do like the colors you used.
Beautiful…looking forward to the cutting video…a master soap!
Not enough soap in this one to cut, but I will do a big one and cut it.
hummmmmmmm
Your soaps are all so wonderful. Thanks for watching
It’s cold processed. So no alcohol.
All natural colours I used : Natural Yellow, Natural Red, Natural Orange,
From new directions. A mixture of black clay and activated charcoal for the
black. t’s amazing how bright you can get the natural colours to be, just
play around with it. I only use natural colours and my soaps are bright
with out bleeding. Natural colours bleed, but you have to just play around
to know how much to use. Good Luck 🙂 video respond if you make some
not yet, its not really deep so I don’t think the colours will really pop.
My next one will be deeper and I’ll use dividers.
very nice, did you cut it yet please?
WHAT TYPE OF COLORS DO U USE? THEY R BRIGHT.
A masterpiece! Luv, Rene x
AWW, thanks 🙂
nice soap! will u be uploading a cutting video for that! I’d love to see
how it came out!
It is very easy and beautiful. Thanks
Have just. One across yr vid, love love love it. I’ve just started on the
acrylic road and you have given me lots of inspiration
I think it would have looked better with a little less blue, but I still
like it :)
Really nice!
My New Channel “Pencils and Paint” http://youtu.be/dMMroUBuvT4
Art tip and tricks, techniques, lessons and tutorials, and projects that
are Easy and Fun for Everyone! Developed with the beginner in mind.
I thought this was Jesse Pinkman…
I used a floating medium and I learned a lot on how not to go to much with
it on the board. I also learned to not go nuts with a spray bottle. Also I
am a messy lady. lol Mine came out good. And patience is a must! (getting
there)
Love it… thanks for sharing your technique.
Bravo et merci pour cette vidéo très intéressante !
The music horrible and the paint too
Like the technique – Enjoyed the video, background music and the cig,
reminded me of me. Thanks for the share.
Great vid. Nothing at all wrong with the length of it. I appreciated being
able to watch an art vid in real time. Thank you. :)
gnarly stuff bruhz!!! shmick ink 2 ;)
What kind of paints are you using? Thanks.
I had a hard time focusing on the tutorial because I kept worrying about
the paint spilling on the white rug underneath the table or onto the deer
print throw blanket he’s sitting on. lol
Just lovely love the use of colour and the sky scene is wow I do sky scenes
with stampscape stamps but I just loved this
Beautiful…
top! :)
Can someone tell me if it is ok to let it dry in the hot garage? Or should
I let it dry in my bedroom with ac?
I’m usually not a ‘planet’ type person, Stephen, but this is absolutely
beautiful! I love your color choices, and your patience in urging the
colors to merge and move during the ‘flow’ process. Very nice piece!
did you use any medium on it firs like a flow aid ?
Beautiful!
Very cool, I adore it!
Hard to watch as an artist seeing a cig that close to paint. Just keep
imagining ash falling into it and the smoke seeping into the canvas. I’m
the type who washes my hands constantly during any artwork on paper in case
of oils from my fingers embedding into the surface.
50/50 paint to water ratio will ruin binder agent… no more than 30% of
water is a good measure for good final finish. or you can add acrylic
medium for air brushing is better than adding more water